PiEye Smart Glasses
Augmented Reality Assistant
By Ryan Chan (rc627) and Liam Sweeney (lms445@cornell.edu)
May 14, 2023
Demonstration Video
Introduction
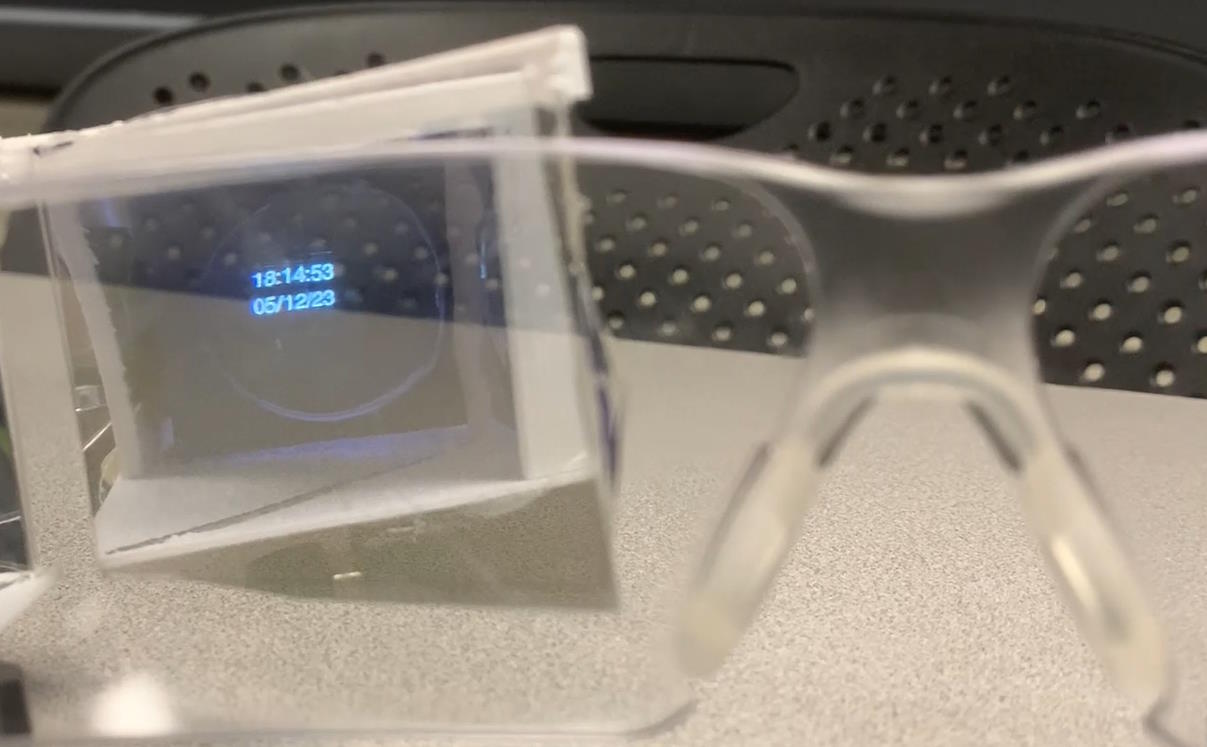
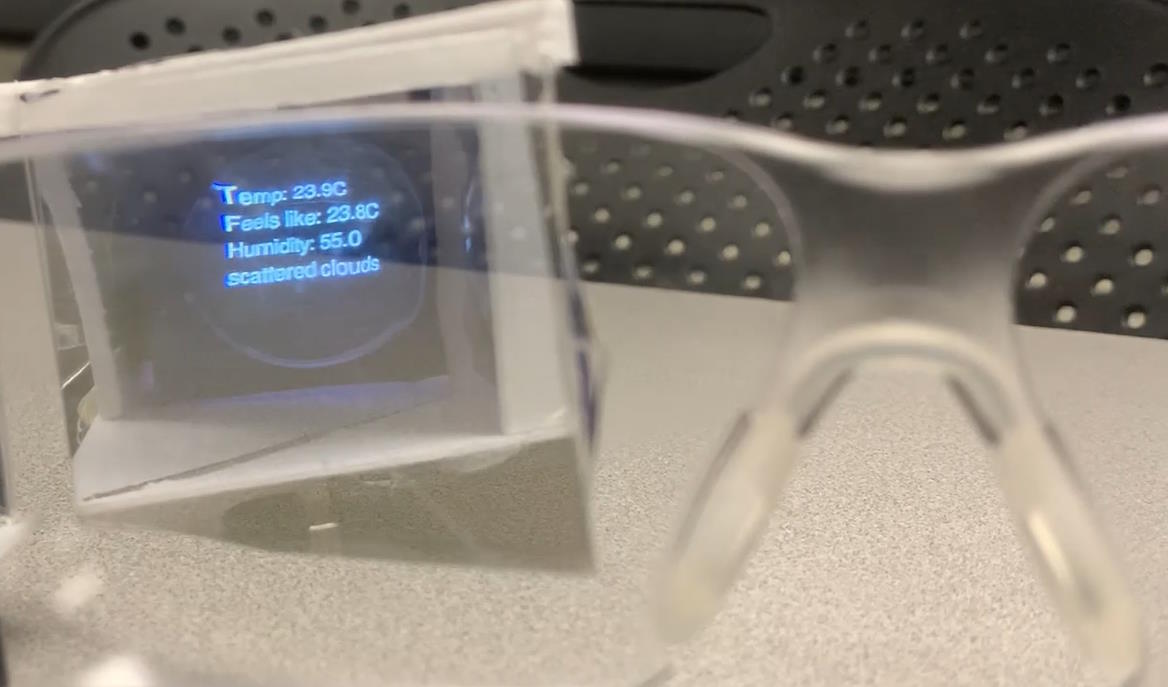
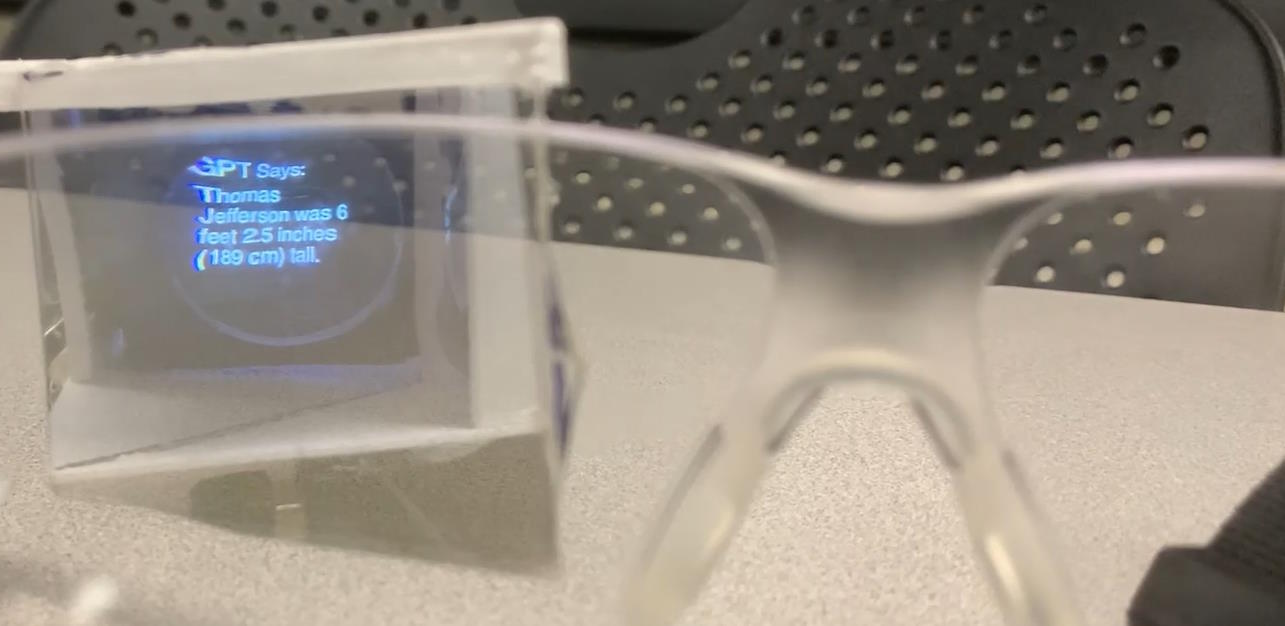
The PiEye Smart Glasses system is an augmented reality assistant similar to Google Glass. It takes user commands spoken through a microphone and then responds to the user’s command by displaying the response to a semi-transparent heads-up display (HUD). Asking it about the time will cause it to display a digital clock with a date, and asking it about the weather will cause it to display the current temperature, humidity, and a short weather description for Ithaca, NY using the OpenWeatherMap API. If the user’s command isn’t about the time or weather, it will ask ChatGPT about the user’s question using the OpenAI API.
Project Objectives:
- Display time and weather on the heads-up display (HUD) using physical buttons as input.
- Display time and weather on the HUD using voice commands from a microphone as input.
- Use ChatGPT to answer questions that don’t involve the time or weather and display them on the HUD.
- Make the device portable and compact.
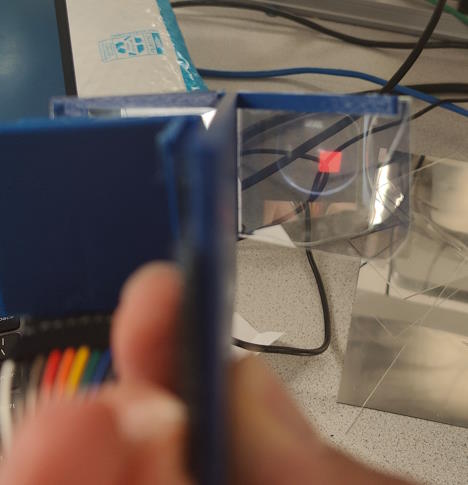
Images
Design and Testing
Overall Design
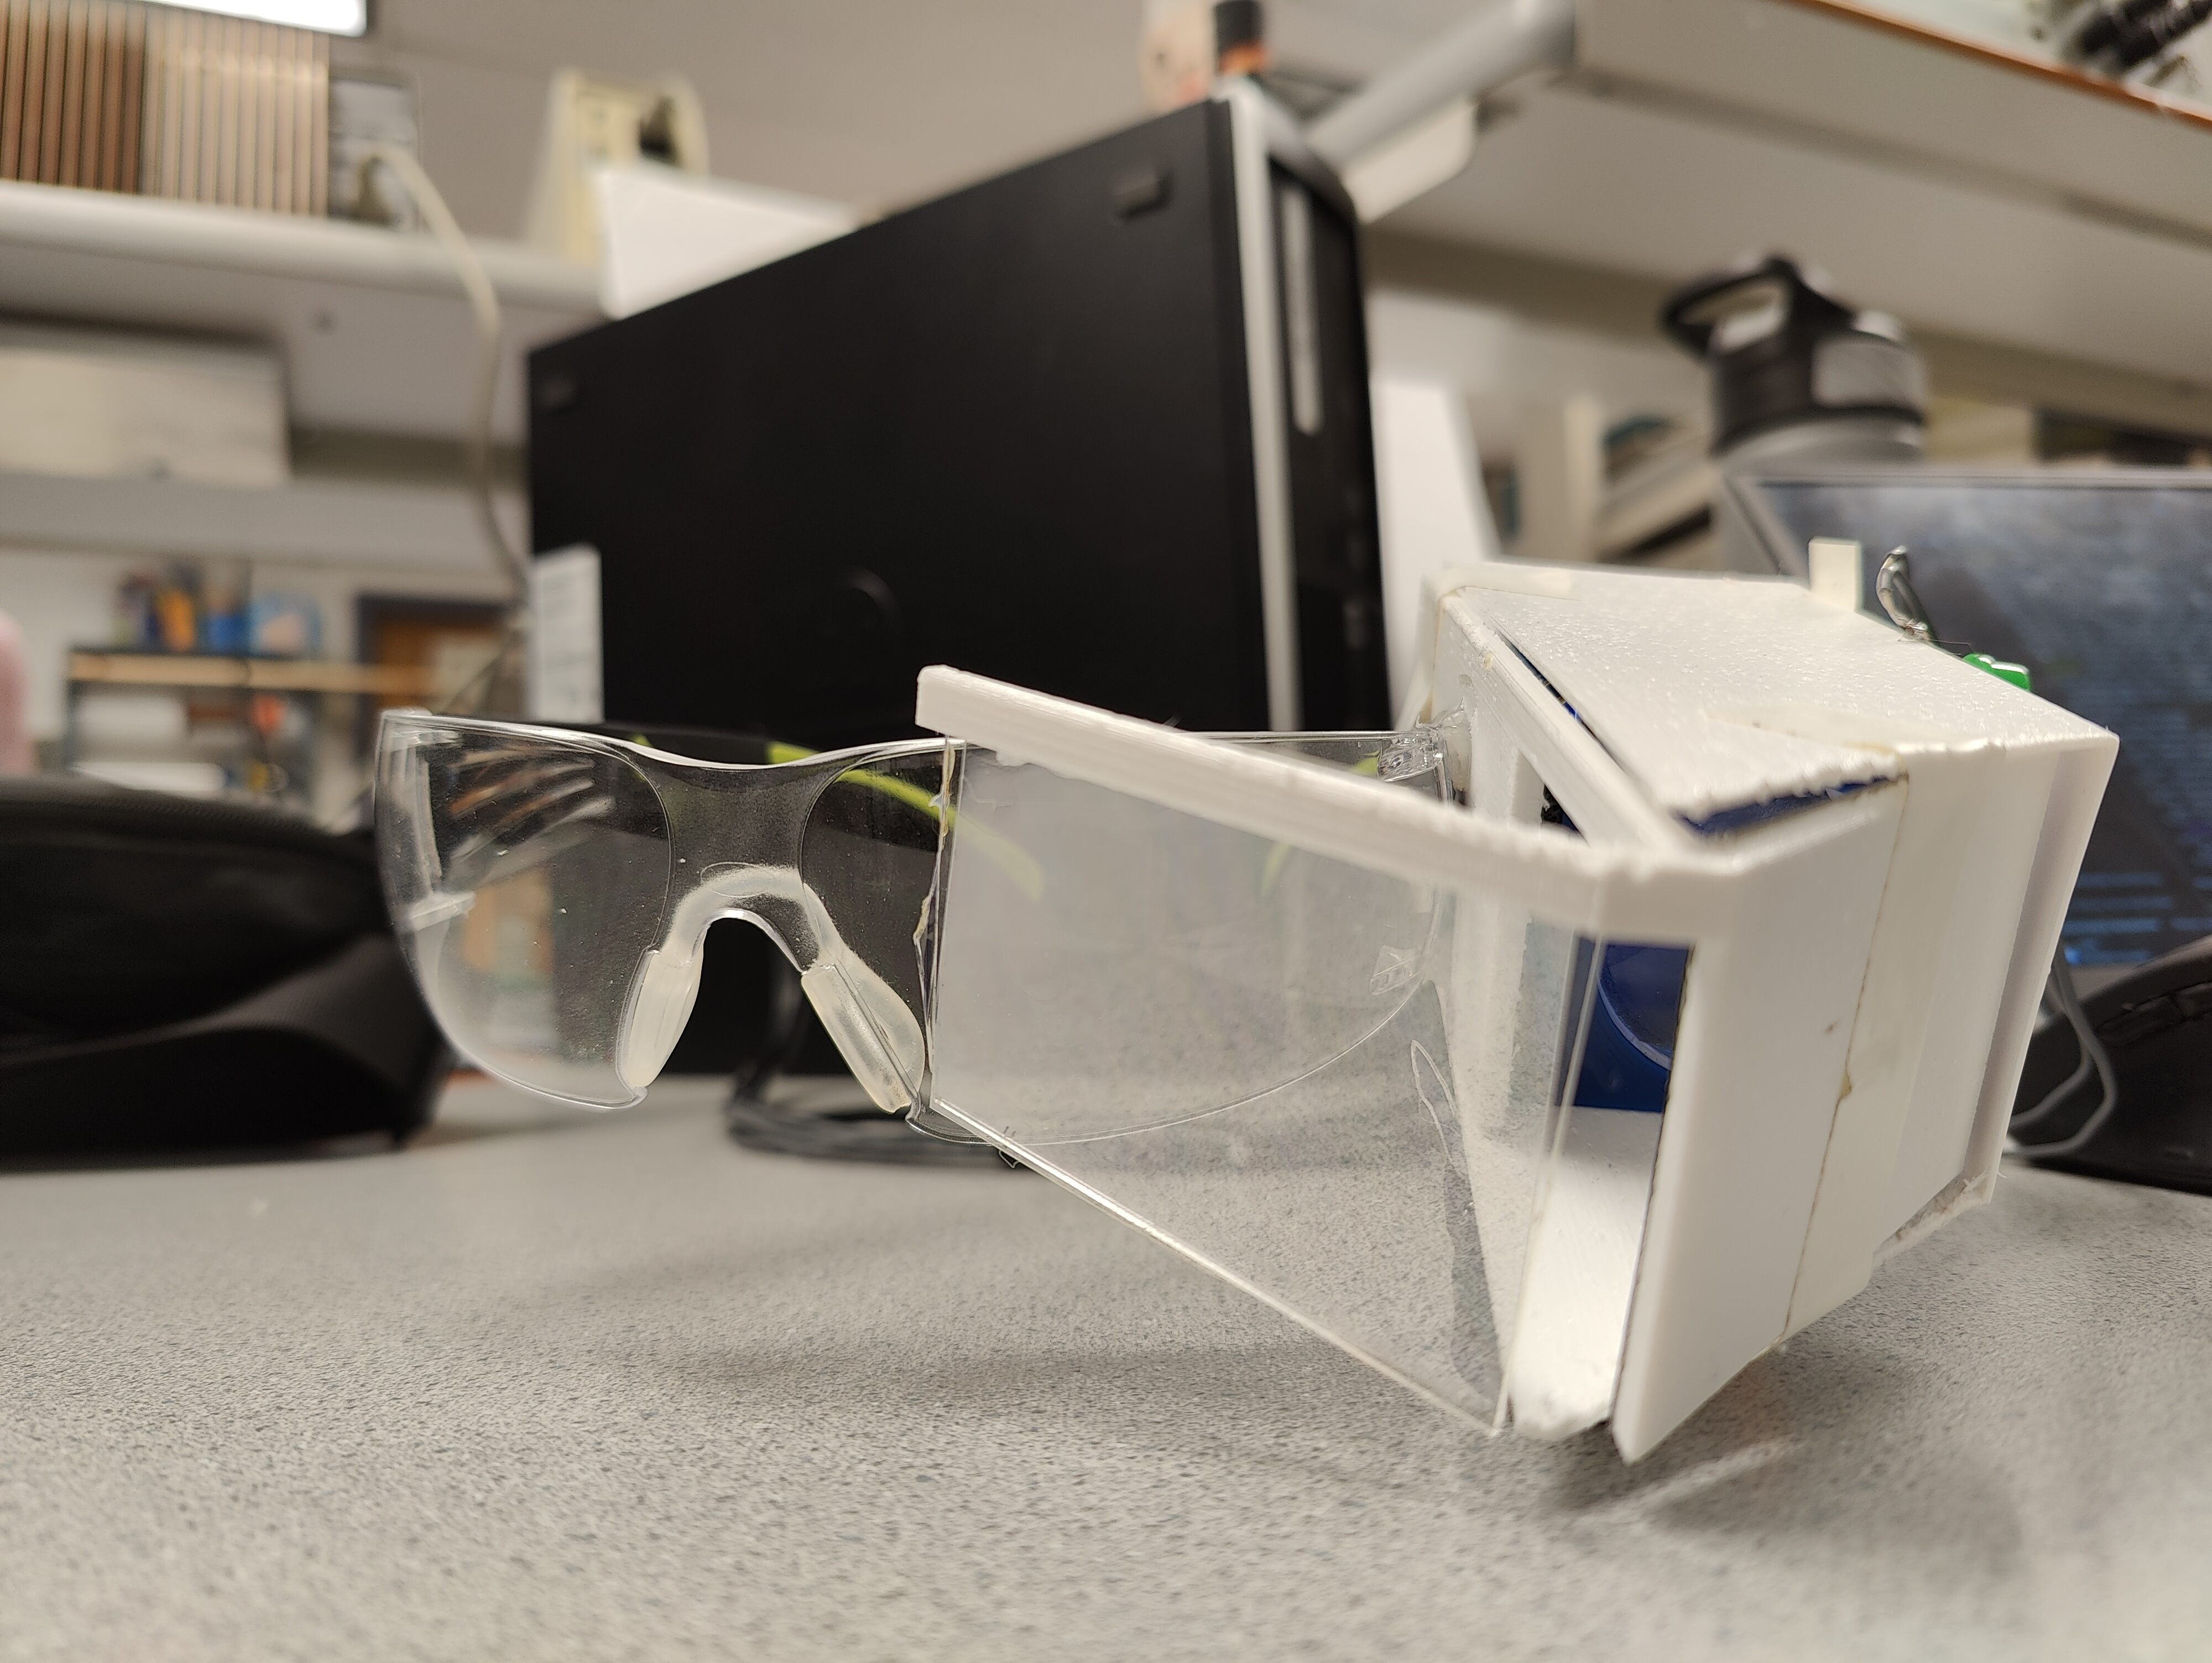
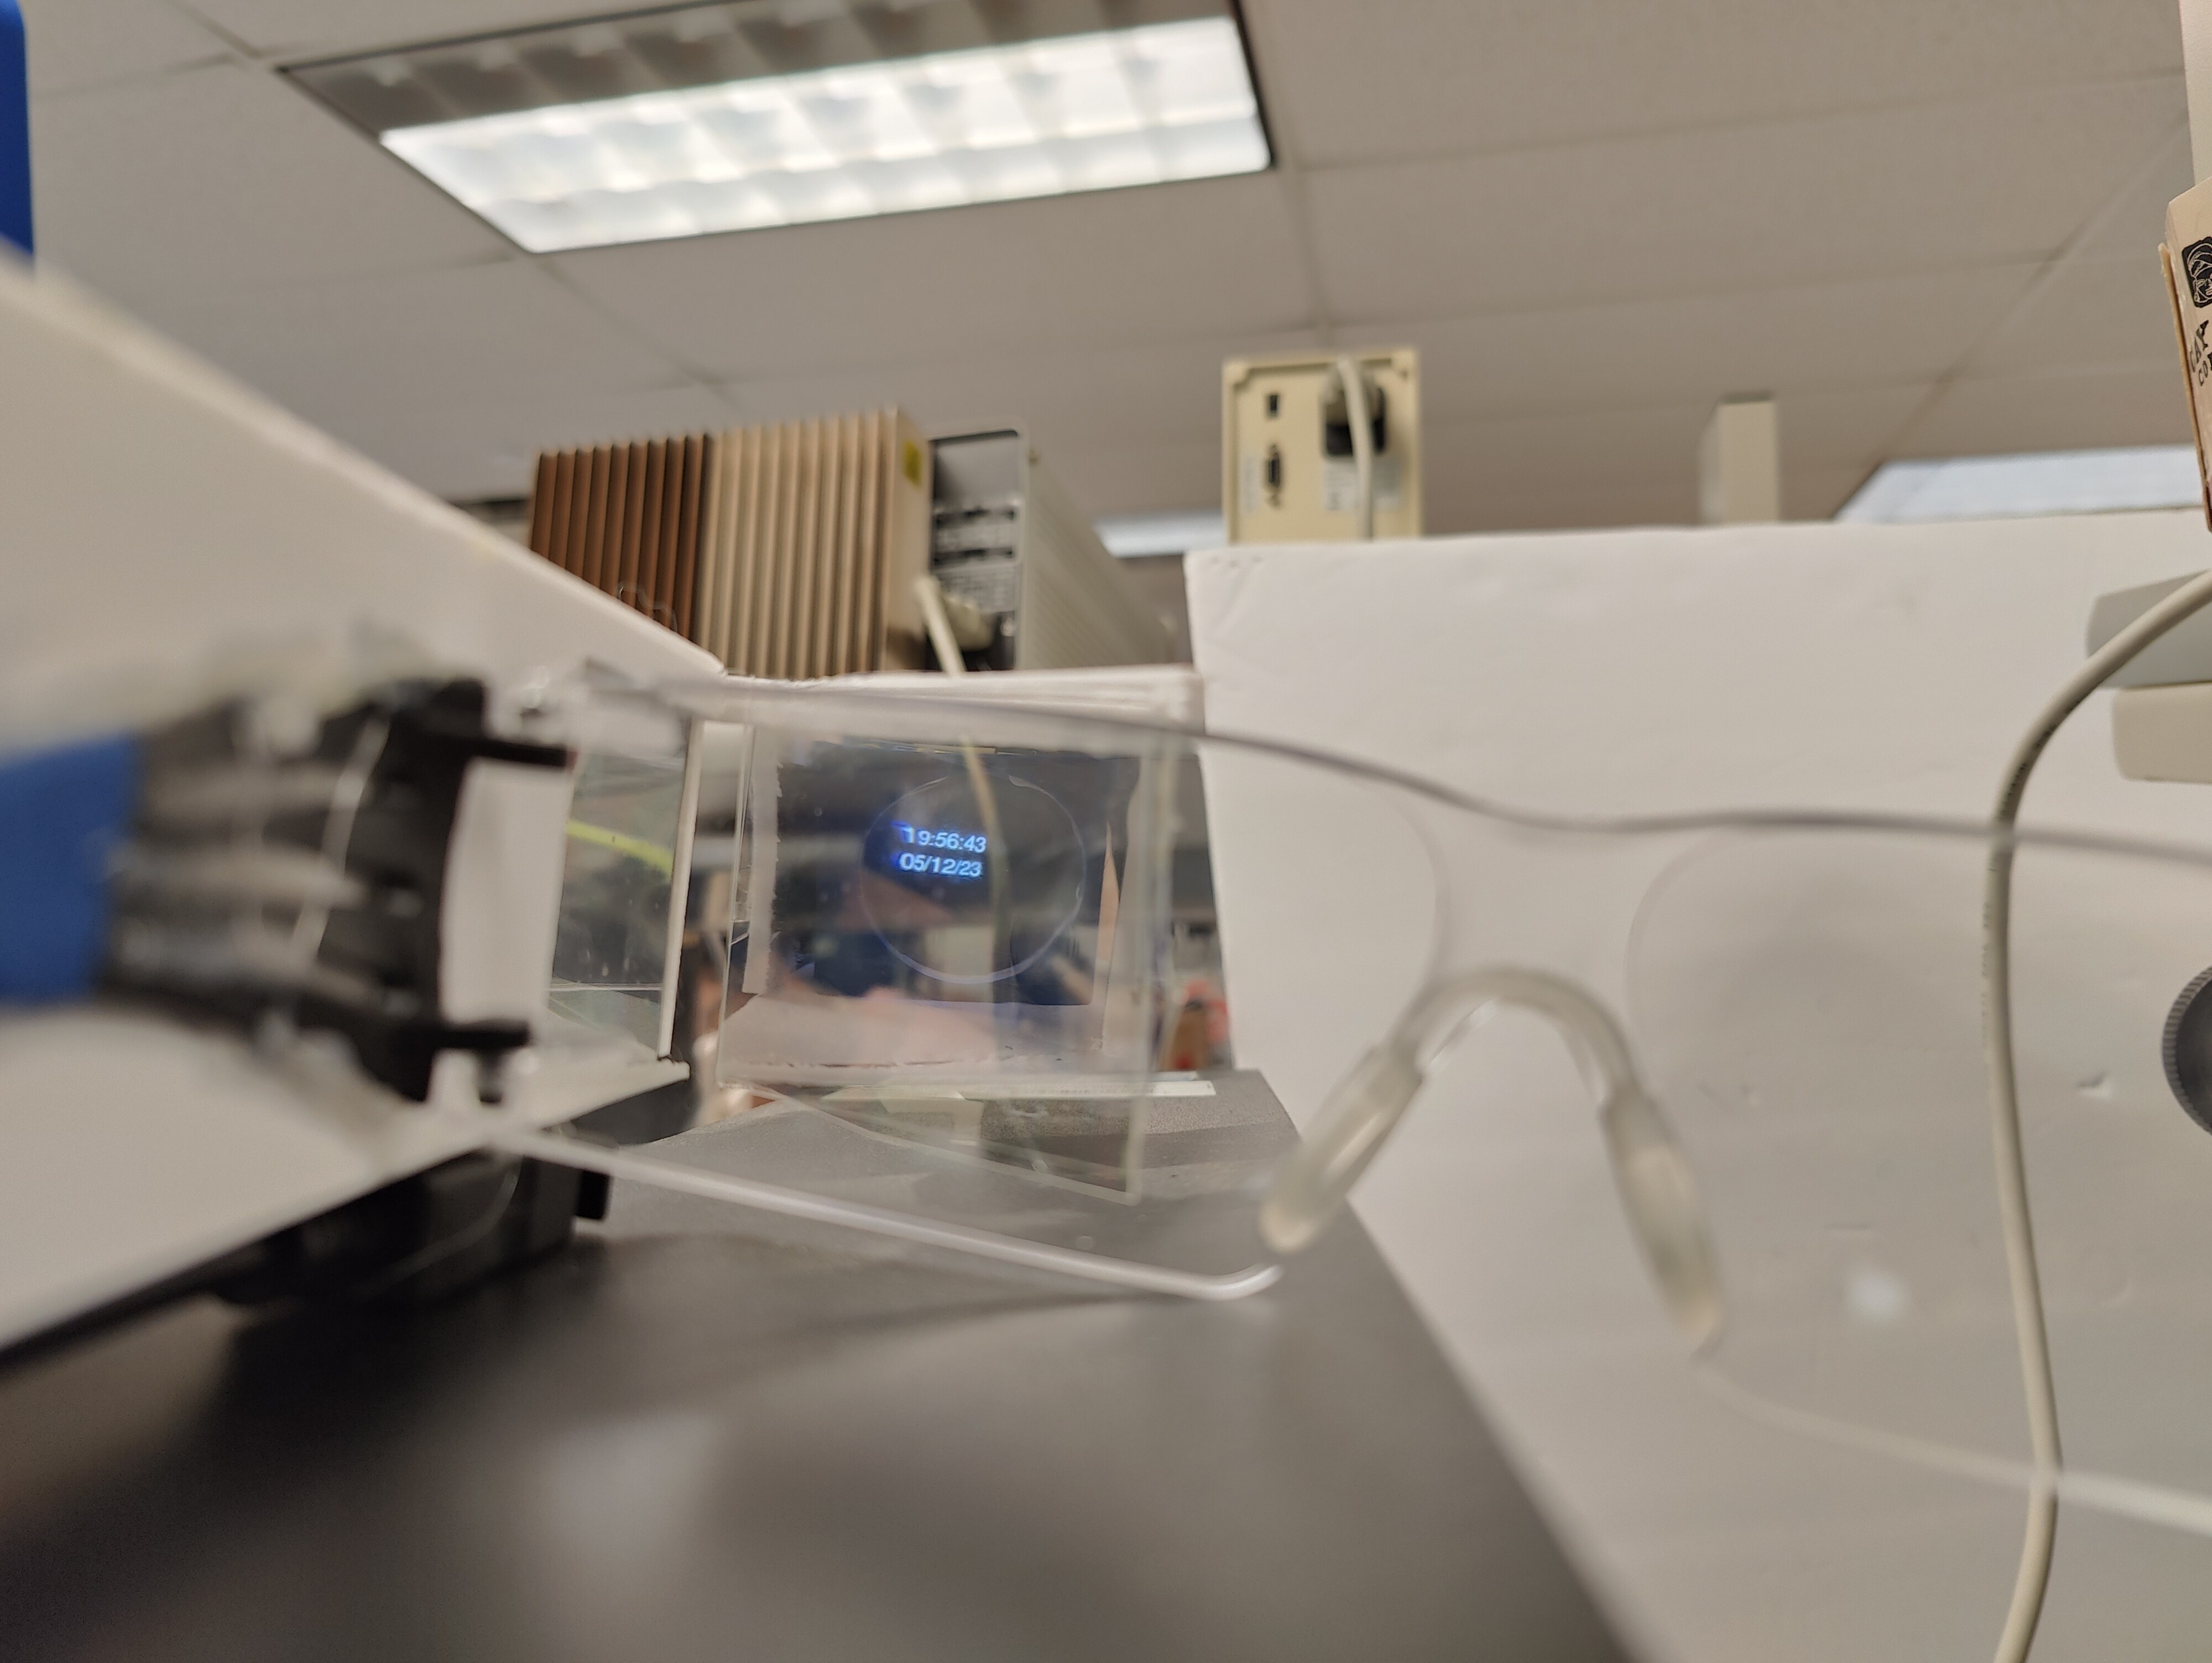
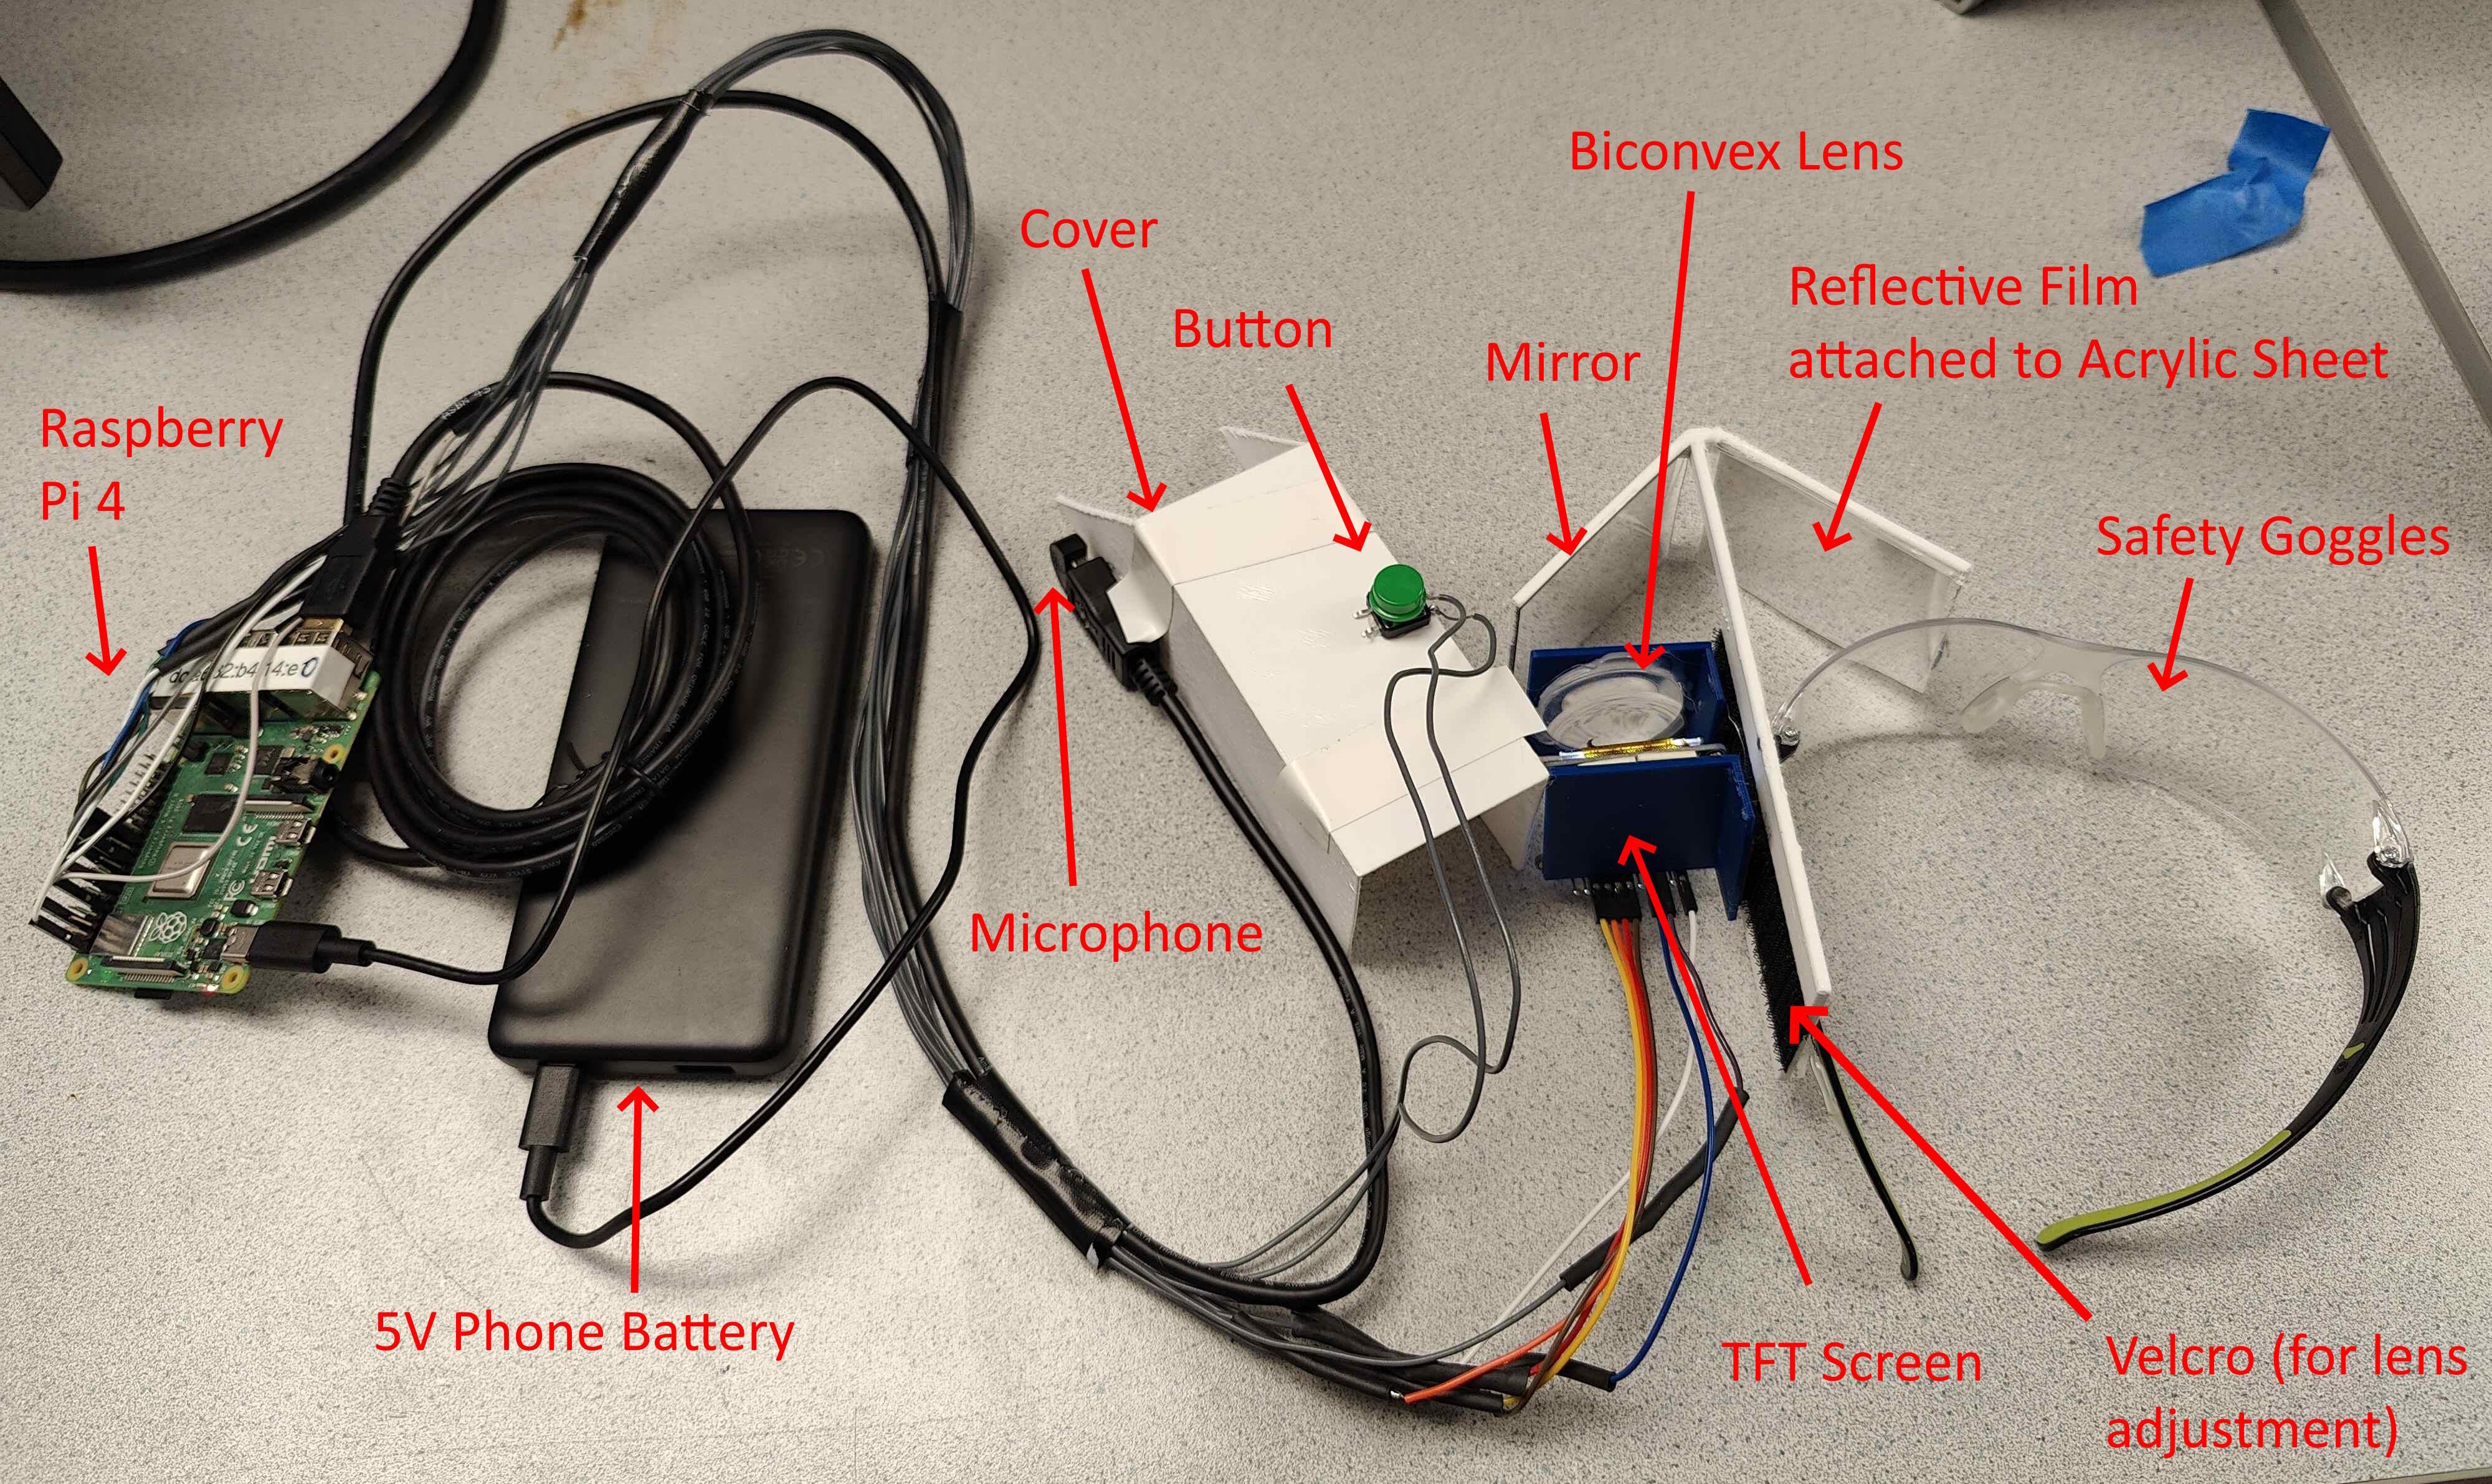
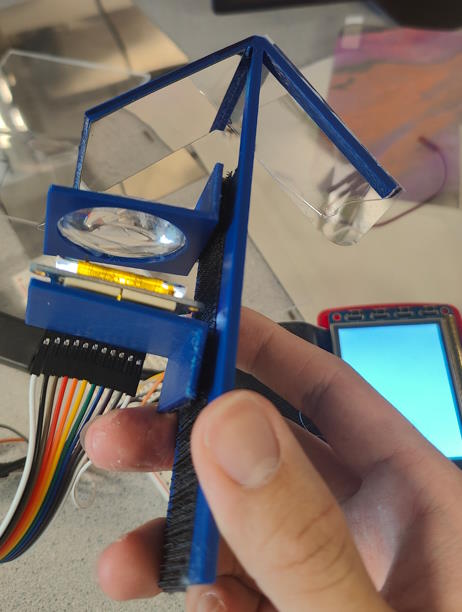
Our final design consists of two main parts: a Headset and a Control Unit. The headset will be a 3D-printed HUD attached to a pair of safety glasses (which can also be placed over prescription glasses). The HUD attachment will be built using the “reflector sight” method in which a TFT screen will reflect an image onto an angled piece of acrylic with a semi-transparent reflective film. It will also have a convex lens in the middle to act as an optical collimator. Additionally, the headset will contain a microphone to receive user speech input.
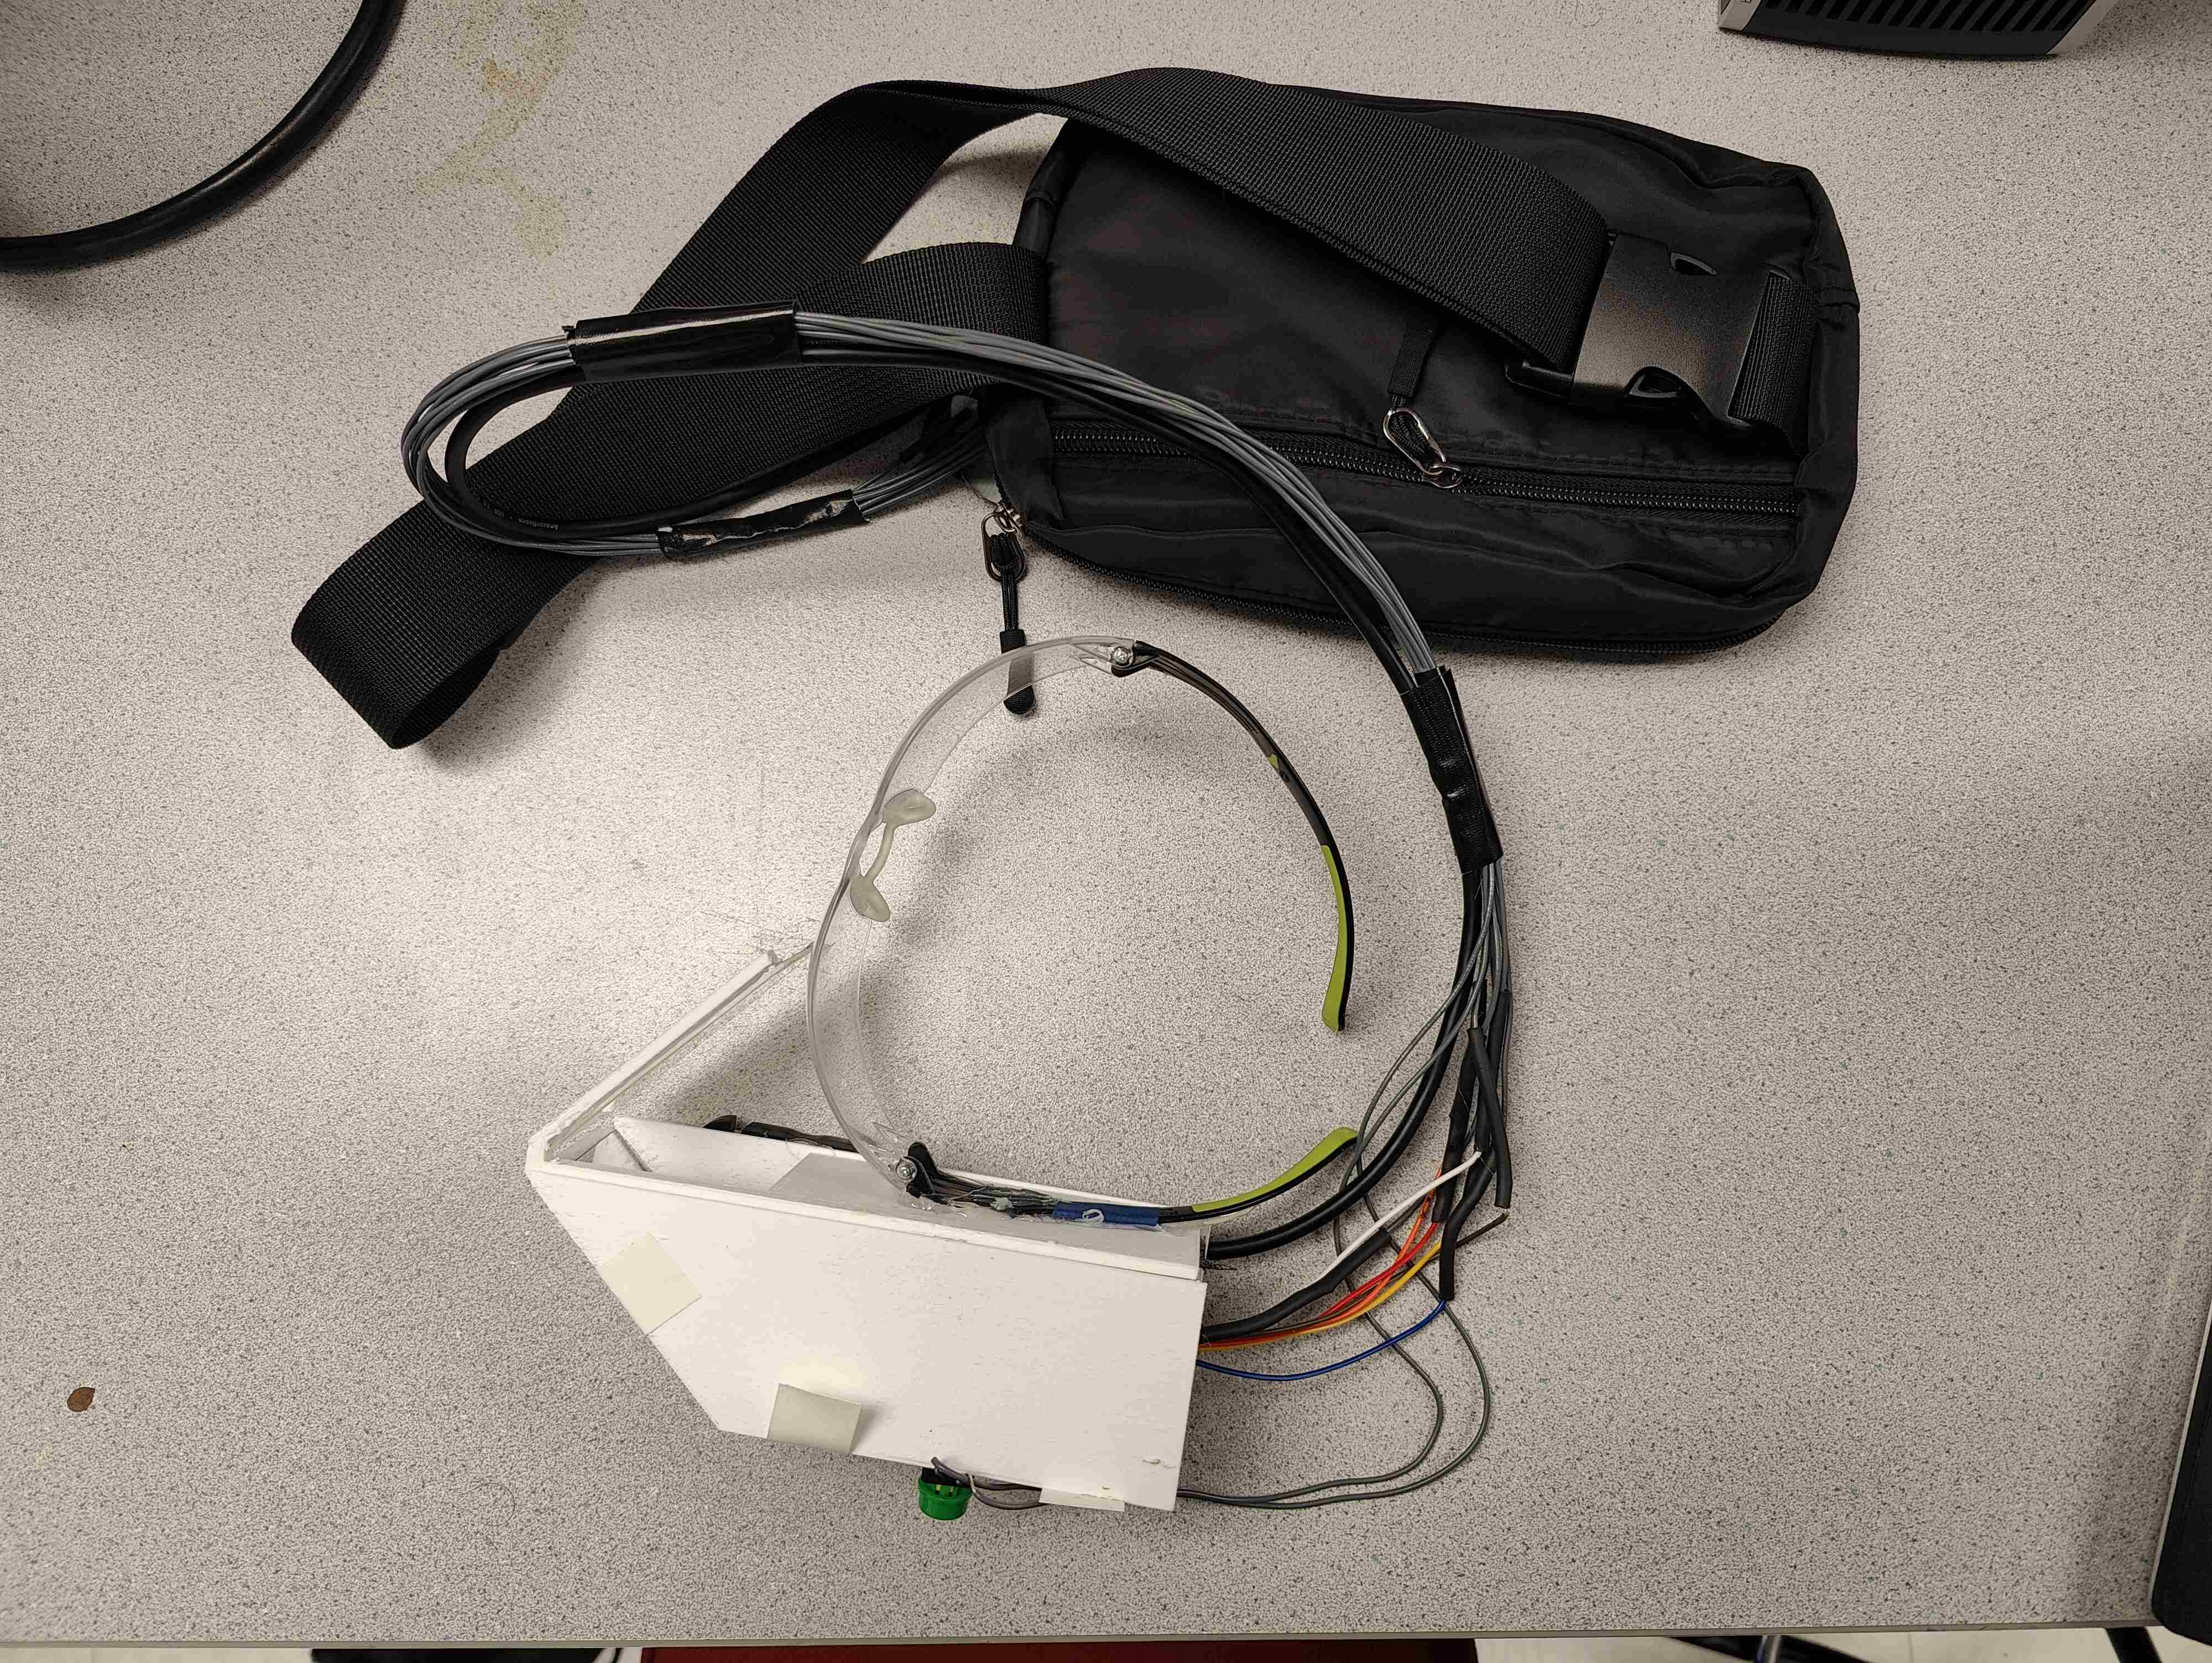
The Headset will connect to the Control Unit, which will handle all the processing and control for the device. The control unit consists of a Raspberry Pi and a phone battery bank to power the device. Since the control unit is heavy, it will be attached away from the headset in a fanny pack or similar holder and will be connected to the headset with a cable carrying the TFT and microphone wires.
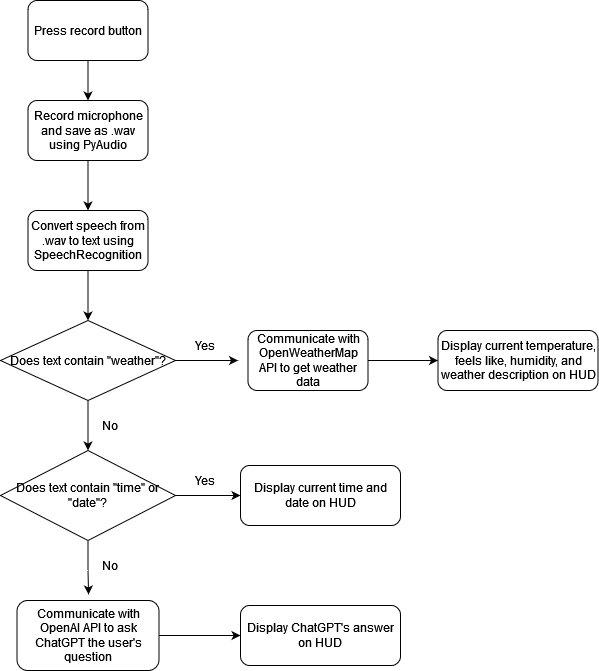
The code running in the Control Unit is summarized on the flowchart below:
Designing and Testing Process
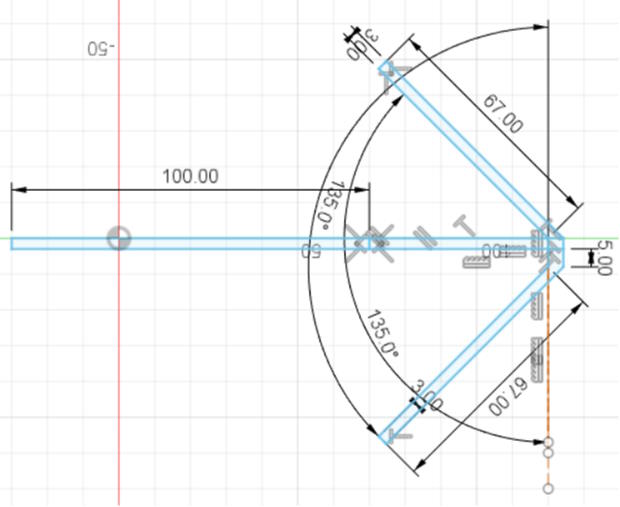
We first started by designing the first iteration of the 3D-printed headset in Fusion 360. Our headset uses the "reflector sight" method and is based on a design by OpenAR (shown below). At this step, we were unsure about how far apart to place the TFT screen and lens to achieve an optimal projection. As a solution, we decided to make the focal distances on the HUD adjustable using velcro. Once this was determined, the designing and printing process went smoothly.
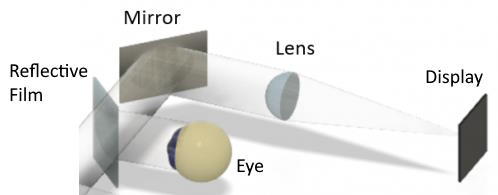
Image credit for above: OpenAR
Once this was completed, we next worked on interfacing the Adafruit ST7789 TFT screen with the Raspberry Pi. We initially tried to use the Adafruit TFT similarly to the piTFT from class, but ultimately failed. We then tried to use the Adafruit guide for the screen, which included a wiring schematic (shown below) and example code. We were then successfully able to display text and shapes. Once this was completed, we assembled the entire headset and had it display a red box as a test.

Image credit for above schematic: Adafruit ST7789 TFT Documentation
We then proceeded to add the time and weather functionality. We obtained the time from the Raspberry Pi system and obtained the weather data from the OpenWeatherMap API. We then added physical buttons so that pressing one button will display the time and date on the HUD and the other button with display the current temperature, humidity, and weather description. This all went very smoothly and concluded the baseline version of our design. To test it, we pressed the buttons in various combinations and checked the displayed time and weather to make sure it was correct, which was successful.
We then moved on to our first reach goal, which was to replace the physical control buttons with a microphone so the smart glasses can respond to spoken requests from the user. For example, if the user says “What time is it?” the glasses will show the time. We first tried to record speech and save it as a .wav file using the PyAudio Python library. We initially ran into issues reading audio from the audio jack and eventually discovered that the audio jack on the Raspberry Pi only outputs audio and does not take audio input. We resolved this problem by using a USB microphone instead of a microphone plugged into the audio jack. Another issue we encountered was that PyAudio did not instantly start recording audio, which would often cause the first few words of a user’s command to be cut off. We resolved this by adding instruction prompts for the user that would display on the HUD “Stand By…” when the PyAudio isn’t ready and “Recording…” when the PyAudio is ready to record. We then proceeded to write code that would take the audio recorded in the .wav file and then convert it into text. We used the SpeeechRecognition Python library running Google Speech Recognition to do this, which went smoothly. This was integrated into our main code so that the smart glasses can now use speech to determine whether it should display time or weather. To test this, we spoke commands to display the time and weather in various ways (e.g. “what time is it?”, “show me the time please”, “give me the time”) and checked the displayed time and weather to make sure it was correct, which was successful.
Once speech recognition was complete, we proceeded to work on our second reach goal, which was to add ChatGPT so that the smart glasses can ask ChatGPT questions that aren’t related to the time or weather. We used the OpenAI API running the gpt-3.5-turbo model to do this, which went smoothly. One minor issue we encountered was that the answers it gave were often too big to fit on the HUD display. We eventually resolved this by wrapping the text and telling ChatGPT to limit its responses to 10 words. This worked reasonably well, although there were some instances where it will still give responses longer than 10 words. We tested this by asking the smart glasses various questions not related to the time or weather (e.g. “Who was the first president of the United States?”, “Where is Cornell University?”), which it was successfully able to answer. We also mixed in questions about the time and weather to ensure those features were still functioning correctly, which they were.
Results
Overall, we feel like our project was successful, fully meeting our baseline goals while achieving practically all of our stretch-goals as well. While there was trouble encountered for all of the elements that we were merging together (new LCD screen, voice recognition API, etc.), a lot of them were resolved once we managed to dig down into the issue.
While this was the case, and while we managed to work the system up into a somewhat desirable state, the portability/compactness of the device did suffer overall due to a lack of thorough planning. Although the idea of placing the physical Raspberry Pi and battery in an exterior battery pack, the chamber we needed to create for the PiEye component itself inherently had a level of bulkiness and weight to it that made it difficult for the user to use.
Conclusions
The project overall is able to functionally work as intended. With the Raspberry Pi and battery zipped away in the fanny pack, it made the idea of having an array of buttons seem unappealing, so we placed a single moderately-sized button on the glasses and moved to a fully-voice-controlled system as our final product. Upon pressing the button, the system prepares itself and then takes in a user command for 3 seconds via the mini microphone attached to the glasses. From this point, it utilizes an API to figure out the voice commands before performing the requested action, whether it be date/time information, weather information, or asking ChatGPT to formulate a short response to display. The ChatGPT functionality does have the memory component that can be noticed in the online version, allowing the user to have more streamlined conversations with it.
Although there were difficulties encountered throughout the assembling and programming of this device, there was no problem that we encountered that caused the ultimate removal or redesigning of features within the design.
Future Work
While the optical design of the PiEye is inherently bulky, future work could still be done in order to make the apparatus as a whole less bulky, or overall just have a better design for how exactly the user will end up wearing the device as the inclusion of glued-on safety glasses was a last minute decision as we did not fully think through that element as we had the fanny pack.
Additionally, we believe that there could be future work to be done within the sphere of working on the ChatGPT API. We instructed it to formulate responses is a straightforward manner so that the text could fit on the screen with ease, but there is sometimes where this will either cause ChatGPT to freeze up if it can not find a way to get it short enough.
Finally, we selected very carefully what elements of weather data to display on the screen, however we receive a lot more data than we are displaying. Future work could allow the user to configure either what is shown on the default weather screen or request to be shown specific elements of the weather data.
Work Distribution
Ryan Chan
rc627@cornell.edu
- Designed and 3D printed headset
- Wrote code for Weather and ChatGPT APIs
- Helped write code for voice recognition and TFT display
- Overall debugging

Liam Sweeney
lms445@cornell.edu
- Built the hardware assembly
- Designed the overall program flow
- Built the TFT display's basic button-based design
- Overall debugging
Budget/Parts List
- Raspberry Pi - $35.00
- Adafruit 1.54" 240x240 TFT LCD Display, ST7789 - $17.50
- Phone battery bank - 16.99
- Fanny pack - $6.99
- Super Mini USB 2.0 Microphone - $6.99
- USB 2.0 Extension Cable - $4.93
- Safety Glasses - $5.00
- HUD Reflective Sheet - $4.00 (used 1 of 2 pack)
- Cut-to-Size Mirror Sheet - $3.00 (using 1 of 4 pack)
- Biconvex Lens, 34mm diameter, 45mm focal length - $2.50 (using 1 of 4 pack)
- Acrylic Sheet - $1.00 (using 1 of 6 pack)
- PLA Plastic Filament (for 3D printing) - $2.02 (estimated by Prusa Slicer)
- Tape, velcro, and wires - Provided in lab
Total: about $105.92 (not including tax and shipping)
References
[1] ChatGPT API Documentation[2] ChatGPT API Guide
[3] OpenWeatherMap API Documentation
[4] Python SpeechRecognition Library Guide
[5] Python PyAudio Library Guide
[6] Adafruit TFT LCD Display Guide for Python
[7] R-Pi GPIO Document
[8] OpenAR (Inspiration for headset design)
3D Files Appendix
Code Appendix
import digitalio
import board
import RPi.GPIO as GPIO
import subprocess
import time
import openai
import textwrap
import requests
import pyaudio
import wave
import speech_recognition as sr

from PIL import Image, ImageDraw, ImageFont
from adafruit_rgb_display import ili9341
from adafruit_rgb_display import st7789  # pylint: disable=unused-import
from adafruit_rgb_display import hx8357  # pylint: disable=unused-import
from adafruit_rgb_display import st7735  # pylint: disable=unused-import
from adafruit_rgb_display import ssd1351  # pylint: disable=unused-import
from adafruit_rgb_display import ssd1331  # pylint: disable=unused-import

# Set API Keys Here: ===========================================================
openai.api_key = 'OpenAI API Key Here'
openweathermap_api_key = 'OpenWeatherMap API Key Here'

# Set up GPIO ==================================================================
GPIO.cleanup()

# Setup GPIO Buttons
GPIO.setup(17, GPIO.IN, pull_up_down=GPIO.PUD_UP)
GPIO.setup(22, GPIO.IN, pull_up_down=GPIO.PUD_UP)
GPIO.setup(27, GPIO.IN, pull_up_down=GPIO.PUD_UP)

# Set up TFT LCD ===============================================================

# Configuration for CS and DC pins (these are PiTFT defaults):
cs_pin = digitalio.DigitalInOut(board.D18)
dc_pin = digitalio.DigitalInOut(board.D25)
reset_pin = digitalio.DigitalInOut(board.D24)

# Config for display baudrate (default max is 24mhz):
BAUDRATE = 24000000

# Setup SPI bus using hardware SPI:
spi = board.SPI()

# pylint: disable=line-too-long
# Create the display:
disp = st7789.ST7789(
    spi,
    height=240,
    y_offset=80,
    rotation=0,  # 1.3", 1.54" ST7789

    cs=cs_pin,
    dc=dc_pin,
    rst=reset_pin,
    baudrate=BAUDRATE,
)
# pylint: enable=line-too-long

# Create blank image for drawing.
# Make sure to create image with mode 'RGB' for full color.
if disp.rotation % 180 == 90:
    height = disp.width  # we swap height/width to rotate it to landscape!
    width = disp.height
else:
    width = disp.width  # we swap height/width to rotate it to landscape!
    height = disp.height
image = Image.new("RGB", (width, height))

# Get drawing object to draw on image.
draw = ImageDraw.Draw(image)

FONTSIZE = 15
#font = ImageFont.truetype("/usr/share/fonts/truetype/dejavu/DejaVuSans.ttf", FONTSIZE)

font = ImageFont.truetype("/usr/share/fonts/truetype/freefont/FreeSans.ttf", FONTSIZE)

# ChatGPT ======================================================================

preprompt = "Give a straightforward response within 10 words"

payload = []

payload.append( {"role" : "system",
                "content": preprompt} )

# Voice Recognition ============================================================

r = sr.Recognizer()

# function to record audio from microphone and save as .wav file
def record_audio(seconds):
    draw.rectangle((0, 0, 240, 240), outline=5, fill=(0, 0, 0))
    draw.text((70,120), "Stand By...",font = font, fill = (255,255,255))
    disp.image(image)

    # the file name output you want to record into
    filename = "recorded.wav"
    # set the chunk size of 1024 samples
    chunk = 1024
    # sample format
    FORMAT = pyaudio.paInt16
    # mono, change to 2 if you want stereo
    channels = 1
    # 44100 samples per second
    sample_rate = 44100
    record_seconds = seconds
    # initialize PyAudio object
    p = pyaudio.PyAudio()
    # open stream object as input & output
    stream = p.open(format=FORMAT,
				    channels=channels,
				    rate=sample_rate,
				    input=True,
				    output=True,
				    frames_per_buffer=chunk)
    frames = []

    print("Recording...")
    draw.rectangle((0, 0, 240, 240), outline=5, fill=(0, 0, 0))
    draw.text((70,120), "Recording...",font = font, fill = (255,255,255))
    disp.image(image)

    for i in range(int(sample_rate / chunk * record_seconds)):
	    data = stream.read(chunk)
	    # if you want to hear your voice while recording
	    # stream.write(data)
	    frames.append(data)

    print("Finished recording.")
    draw.rectangle((0, 0, 240, 240), outline=5, fill=(0, 0, 0))
    draw.text((70,120), "Processing...",font = font, fill = (255,255,255))
    disp.image(image)

	# stop and close stream
    stream.stop_stream()
    stream.close()
	# terminate pyaudio object
    p.terminate()
	# save audio file
	# open the file in 'write bytes' mode
    wf = wave.open(filename, "wb")
	# set the channels
    wf.setnchannels(channels)
	# set the sample format
    wf.setsampwidth(p.get_sample_size(FORMAT))
	# set the sample rate
    wf.setframerate(sample_rate)
	# write the frames as bytes
    wf.writeframes(b"".join(frames))
	# close the file
    wf.close()

# function to convert audio from.wav file into text
def audio_to_text():
    speech = sr.AudioFile('recorded.wav')
    with speech as source:
        r.adjust_for_ambient_noise(source)
        audio = r.record(source)

    return r.recognize_google(audio)

# Weather code =================================================================

def extractWeatherData():
    base_url = "http://api.openweathermap.org/data/2.5/forecast?"
    city_name = "Ithaca,US"

    complete_url = base_url + "appid=" + openweathermap_api_key + "&q=" + city_name
    response = requests.get(complete_url)
    weatherJSON = response.json()
    temp = round(float(weatherJSON['list'][0]['main']['temp']) - 273.15, 1)
    feels_like = round(float(weatherJSON['list'][0]['main']['feels_like']) - 273.15, 1)
    humidity = round(float(weatherJSON['list'][0]['main']['humidity']), 1)
    description = weatherJSON['list'][0]['weather'][0]['description']
    return {"temp":temp, "feels_like":feels_like, "humidity":humidity, "description":description}

state = 1

while True:
    # Poll GPIO pins for buttons and set state based on button presses
    # Note: Physical buttons for time and weather kept for debugging purposes
    time.sleep(0.2)
    if (not GPIO.input(17)):
        state = 1
    if (not GPIO.input(22)):
        state = 2
    if (not GPIO.input(27)):
        state = 3

    # If in state 1, show the time
    if state == 1:
        draw.rectangle((0, 0, 240, 240), outline=5, fill=(0, 0, 0))
        cmd = ('date +%T')
        p = subprocess.run(cmd, capture_output=True, shell = True)
        draw.text((70,110), str(p.stdout)[2:-3],font = font, fill = (255,255,255))
        cmd = ('date +%D')
        p = subprocess.run(cmd, capture_output=True, shell = True)

        draw.text((70,130), str(p.stdout)[2:-3], font = font,fill = (255,255,255))
        disp.image(image)

    # Else if in state 2, show the current weather
    elif state == 2:
        draw.rectangle((0, 0, 240, 240), outline=5, fill=(0, 0, 0))
        data = extractWeatherData()
        draw.text((65,90), "Temp: " + str(data['temp']) + "C",font = font, fill = (255,255,255))
        draw.text((65,110), "Feels like: " + str(data['feels_like']) + "C",font = font, fill = (255,255,255))
        draw.text((65,130), "Humidity: " + str(data['humidity']),font = font, fill = (255,255,255))
        draw.text((65,150), data['description'],font = font, fill = (255,255,255))
        disp.image(image)

    # Else if in state 3, perform speech recognition and set state based on user's speech commands
    elif state == 3:
        record_audio(3)
        try:
            command = audio_to_text()
        except: # handle error if it detected no command
            print("No command detected!")
            draw.rectangle((0, 0, 240, 240), outline=5, fill=(0, 0, 0))
            draw.text((70,110), "No command\ndetected!", font = font, fill = (255,255,255))
            disp.image(image)
            time.sleep(1)
            state = 1
        else: # handle command
            print(command)
            draw.rectangle((0, 0, 240, 240), outline=5, fill=(0, 0, 0))
            draw.text((65,90), "I heard:", font = font, fill = (255,255,255))
            draw.text((65,110), textwrap.fill(command, width = 15), font = font, fill = (255,255,255))
            disp.image(image)
            time.sleep(1.5)

            if("weather" in command):
                state = 2
            elif("time" in command or "date" in command):
                state = 1
            else: # if not about time or weather, ask ChatGPT
                draw.rectangle((0, 0, 240, 240), outline=5, fill=(0, 0, 0))

                payload.append( {"role" : "user",
                                "content": command} )
                chat = openai.ChatCompletion.create(
                                    model = "gpt-3.5-turbo", messages = payload
                )

                response = chat.choices[0].message.content

                payload.append( {"role" : "assistant",
                                "content": response} )

                response = textwrap.fill(response, width = 15)


                print(payload)
                print(response)
                draw.text((65,90), "GPT Says:",font = font, fill = (255,255,255))
                draw.text((65,110), response, font = font, fill = (255,255,255))
                disp.image(image)
                state = 4
    #State 4 = Standby state

GPIO.cleanup()